|
~All images below are clickable - click them to see a larger
higher quality image~
One of the things I’ve always had a concern with was
our well.
We have a great well, (28GPM, GREAT clear water) but it’s
350 or so deep, and I pump the water uphill to a 3,000 gallon
cistern, a total of over 500 feet, vertically. This takes
power, lots of it, about 11 Amps at 240VAC, so I decided
that developing a spring would be a good idea, at some point.
In North Idaho, we have a lot of fresh, beautiful, clean
water, and generally no matter where you drill a well, you’re
going to hit water, the only question is how deep you have
to go. Shallow wells are 150 foot, deep ones are 600 feet.
All of them are EXPENSIVE to drill, $16.00 a foot, minimum.
($1600 per 100 foot deep, OUCH!). And that doesn’t
include a pump, wire, controls, installation…..
We also have springs here. Not everywhere, but many places.
If you walk anywhere in North Idaho, in the woods especially,
and see Fern or Cedar Trees, there’s generally water
there, underground. Neither Cedars nor Ferns will grow without
it.
We have a place here where there are a few ferns, in the
woods, at the end of my driveway. A little spot where the
ground seemed..wetter.
I took my (smaller) excavator out there, and made a hole
maybe 7 or 8 feet deep. Left it alone for a little while,
and sure enough, it filled with water!!! I watched it for
about a year or so, and it never ran dry, always had some
water in it, even in the driest months here, September &
October. The deer started really digging this…
Now, being that I wanted to develop a spring, and I thought
there might be more out there, I decided that a well witcher
might be a good investment, to help me find more water,
before I really started installing stuff…
I hired a witcher to come out & walk my property with
me, looking for springs. (Caveat: If you hire a witcher,
hire one that is INDEPENDENT, not one from a well drilling
company). Think about this for a minute & you’ll
get it.
After walking the property, we found about a dozen places
where we thought there would be water. Willard, the Witcher
I hired, told me to go get an Excavator, a large one, dig
a hole 16 feet deep at each location, and let it sit for
about a year. He said that it takes time for water to find
it’s way to a hole, and I followed his advice. We found
that the original location, the one I had already dug out
a bit, to have the best spring of all. The holes we dug
were close to straight down, maybe 2 bucket widths, and
around 16 feet deep, each. Cost about $500.00 for the excavator,
and $200.00 for the witcher.
|
Area
of springs
|
Ferns
above springs
|
|
|
|
After a year, 4 of the holes we dug held water. The best
one was, like I said, the original one, and three others
had water in them consistently. I decided to use the one
closest to my house, as it was, again, the best producer.
Willard had told me that there would be water in every hole
location he pointed out, the real questions was “how
deep”. In the ones where no water appeared, there was
probably water, again, just deeper than my 16 foot hole.
I did quite a bit of studying on this, and spoke with Willard,
(my Witcher, GREAT Guy, BTW). After agonizing over it aplenty,
I decided to install (2) drywells, and have them overflow
into a 1,000 gallon tank. This would catch (2) springs,
and overflow both of them to the holding tank.
Here’s how I did it:
First, I needed the drywells, some manholes, covers, and
a storage tank.
I wanted (2) of them, one 16 feet deep, and another one
11 feet deep, plus the tank. I bought all of my manholes
& covers from Western Concrete Products in Spokane http://wcpco.com/drywells/drywells.asp
and I bought a new septic tank (1,000 gallons) from another
company in Spokane.
Drywell & Manholes / Components

A tip on buying this stuff….
If you buy drywells, or concrete products that are cast,
like manholes, etc, you have a choice to buy either Number
1’s, which are perfect, w/o blemish etc, or to buy
Number 2’s, which will have cracks & defects. In
this situation, I cared less if the manholes or drywells
leaked, so I bought number 2’s. To give you an example
of the difference in price, a number 1 drywell, 6 feet tall,
will cost around $600 dollars. The same one, defective,
sells for the price of concrete, maybe 60 dollars….altogether,
the drywells & manholes I needed for my springs cost
about $600.00 DELIVERED. The septic tank cost $525.00, total.
How to install a drywell & develop a spring:
There are really a few different parts to this; the drywells,
the holding tank, and a pump house.
In order-
We started at the top, and used the excavator to dig a
hole 18 feet deep. This was a BIG hole, maybe 12-14 feet
across, since it was so deep.
After making the hole, I had a couple of truck & dump
loads of river rock delivered. This is round rock, 1-4 inches
in diameter. We laid (dumped) about 2 feet of river rock
in the bottom of the hole, to set the drywells on. (BTW,
these drywells are kinda…big. They are 4 feet across,
and I think they weigh about 3,000 pounds for every 4 feet
or so).
SO now, we have a DEEP hole, and 2 feet of river rock on
the bottom….
We now set a 5 foot tall drywell on the bottom, and stacked
another one on top of it. Then, we stacked a 3 foot tall
regular manhole (no “drywell” holes in the side)
that looked like this, http://wcpco.com/manholes/man%20hole%20display.asp?name=72_shallow_manhole.jpg
on top of the drywells.
Then, to top it all off, we set a “Cone Section”
on top, and this is what makes the manholes go down in size
so that you can set a regular manhole COVER on top, to protect
the hole, itself, from sticks, leaves, etc falling in.
If you looked at this when we installed it, it looked like
a Titan Rocket! Basically, it’s pretty simple; (2)
drywells, stacked, on top of that; a manhole barrel, 4 feet,
then a “cone” & a manhole cover. Basically,
a long, 4 foot round tube made of concrete, with a concrete
manhole cover on top, 16 feet tall.
After the drywell was completed, we laid in river rock
all the way around the OUTSIDE of the drywell, to within
3 or 4 feet of the surface. Altogether I used 4 truckloads
of river rock. Cost around $650 or so for the rock, delivered,
if I remember right.
Installing Drywell
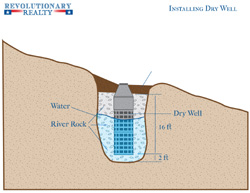
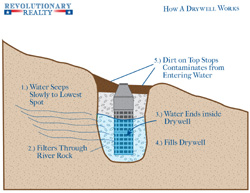
So; here’s how it works:
Water is coming out of the clay/soil in the hole we dug,
naturally. Initially, it hits the river rock, and has to
penetrate it, finding it’s way deeper into the bottom
of the drywell. As it penetrates the river rock, the rock
cleans out sediment, etc, and eventually turns into a really
nice filter, and also becomes a large storage area for a
LOT of water. The drywell itself is nothing more than a
large reservoir for water. A 4 foot diameter drywell holds
94 Gallons per foot of depth, so the upper drywell has about
11 feet of water in it, making 1100 gallons of water, NOT
INCLUDING all of the water stored in the rock, which I estimate
to be about 3 times as much water as is in the drywell itself.
So, the upper drywell has around 4,000 gallons of water
in it.
How a Drywell Works
That was the 16 footer…..
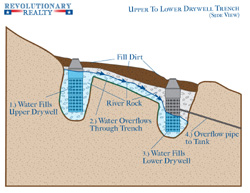
About 25-30 feet below this, I had another spring.
So, we installed another drywell, did the same thing as
above, excepting that we installed the manhole 11 foot deep,
total, instead of 16, like the one above it. We then ran
a trench, underground, between the upper drywell & the
lower one, and filled it with river rock, as a passage for
water to come down from the upper drywell to the lower,
when the upper got to having more than 11 feet of water
depth (or so) in it.
Lower 11 Foot Drywell
So now, we have (2) drywells, a big one, above, overflowing
into a smaller one, below. We pick up water from both springs.
|
Upper
Drywell View 1
|
Upper
Drywell View 2
|
|
|
|
|
Looking
Down on Spring
|
|
|
At the bottom drywell, I drilled a hole (2 inch) and flanged
it up into a 3 inch pipe, and ran this downhill about 40
feet, to my holding tank. This hole was made about 4 feet
from the bottom, and the idea is that when that drywell
gets to having anything over 4 feet or so of water in it,
it overflows out of the pipe into my cistern below it.
Upper to Lower Drywell Trench
(Now, a word from our sponsors on “Holding Tanks”)
When you get a water tank, for underground use, you can
either get one that is “For Potable Water” or
one that is “For Septic”. The same size tank (1,000
gallons) has a cost differential of about $900.00. A “potable
Water” tank costs $1500 or so; a “Septic Tank”
costs $525.00. Both are new, poured from the same concrete.
The only difference is the holes, and you can make your
own with a core drill rented for $20.00 a day.
Me, I went with the Septic Tank…..drilled a couple
of holes, for less than $600 Bucks I have a $1500.00 tank.
But; hey, it’s your choice…..
http://www.wilbertprecast.com/productinfo.php?category=septic
Now, we have (2) drywells, both of them producing water
through a pipe, going into a 1,000 gallon cistern/holding
tank.
1,000 Gallon Cistern
OK, so we got water coming into this tank.
The 1,000 gallon tank filled to the top in about a week,
which is perfectly fine.
Why? Seems slow, huh?
We are DEVELOPING a spring. You don’t “turn it
on”, you have to let Mother Nature develop it FOR you.
What happens is that over time, the fissures in the rock
& ground around those drywells will figure out what
the easiest way is for water to go DOWNHILL, and that has
changed from where it WAS before to where these drywells
are, now.
Over the next few years, the water in the earth will absolutely
make new routes into the drywells, and production will increase.
Over this summer, (a dry one), water never stopped coming
out of those drywells…..it’s winter now, late
December, and water still flows from the spring, albeit
slower, it just drips. But a drip….24 hours a day…..is
a LOT of water. My family uses between 200 & 250 gallons
a day, all inclusive. ¼ gallon a minute equals 15
gallons per hour. 15 Gallons per hour X 24 hours in a day
=360 gallons per day.
A pint a minute will generally take care of a family, if
need be. That’s 180 gallons per day, and trust me,
it’s a drip, not much more.
December 31st - Water Flowing
OK, so what happens when the tank gets full, you say?
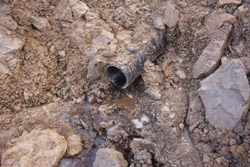
It overflows out of a pipe, into the ditch below the tank.
That’s how I know how much water it is producing. When
you drive by the spring, you see a pipe coming out of the
side of the mountain. It is either running or dripping,
depending on time of year, etc.
Cistern & Plumbing
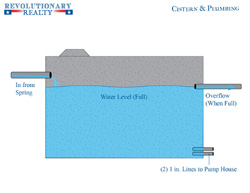
On the opposite end of the tank from where the water comes
in from the springs, I installed another set of manholes;
for a pump house. They are as deep as the bottom of the
tank, and have (2) 1 inch pipes that I installed to hook
a pump to, for solar water pumping from the cistern uphill
to our 3,000 gallon tank, to give pressurization. I bought
steps for the inside of the pump house that you pound into
precast holes so you can climb down into it.
Cistern & Pumphouse Layout
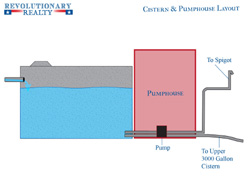
I also am going to use one of the 1 inch pipes to go to
a frost free spigot, so you can get water regardless if
you have power to run the pump, or not.
Spigot
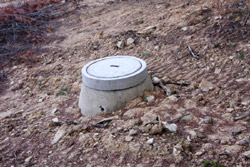
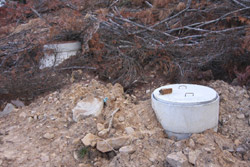
Where this is at, at my home, what you see is a total of
(4) manhole covers, coming out of the ground. The top one
is the upper drywell, the next one down is the secondary,
the third one is the cistern/holding tank, and the final
one is the pump house.
The bottom line is that in North Idaho, you can develop
a spring, spending well less than a couple of thousand dollars,
and have water that is clear, fresh, and plentiful. It takes
a little time, and effort, and is worth it, completely.
There’s nothing like knowing that you have water, no
matter what, and it’s not dependant on any well pump
running. I figure I have around 7,000 gallons of water held
in spring reservoirs, not including the 3,000 gallon tank
above the house. We have had it tested, and it is pristine.
I am going to write another article about developing a
spring using another method that I have seen, where you
don’t dig a hole, you dig a trench, and it works great,
as well. Just another simple alternative to a traditional
well.
Also, I’ll be writing another one on solar water pumping,
which is what we’re doing with the water from this
spring, to our 3,000 gallon tank, providing pressurized
gravity fed water to our house. Coming soon…
Chris
Back To Off Grid Living
|