|
~All images below
are clickable - click them to see a larger higher quality
image~
It took me a LOONNNGG time before I could become convinced
that I could in any way justify the cost of installing solar
panels at my house.
The primary reason for this is that in winter, and in low
sun or clouds, the panels that are out there make almost
no power, and knowing that I’m on the NORTH side of
a mountain…I didn’t think I could ever make it
work.
But then, I came across a couple of articles on “Thin
Film Technology”, and decided to investigate.
One day, I started reading about “Thin Film”
solar panels. They are the latest/greatest thing since sliced
bread, according to the manufacturers….they come in
a lot of different forms, some of them are actually in rolls,
adhesive backed kind of thing. I looked into a lot of different
ones, and decided that I really liked the ones I saw from
the larger companies, First Solar http://www.firstsolar.com
& Q-Cells www.q-cells.com
After a lot of research, I came to a couple of conclusions.
The first big one was that CDTE Thin Film Panels actually
make real power in low light or cloudy conditions. The primary
reason for this is that unlike Monocrystalline or Polycrystalline
Panels, the Thin Films are able to convert all three colors
of light into power. This helps, a lot, and here’s
the reason. Since the Thin Films can convert all three spectrums
of color into power, they also make power across a much
WIDER path of light. In other words, the “aiming”
of the panels isn’t nearly as important as it is with
Poly or Mono Panels. You can have them face almost 80 degrees
out of the sun on a clear day, and they’ll still make
60%+ of their rated power.
That’s impressive.
The downside of the Thin Film panel is that they don’t
make as much power, per square foot, as Poly or Mono panels,
so you need more space to put them in.
BUT, since they make more power across the sun’s path,
and because they convert all three spectrums, they actually
make substantially MORE power than the tried & true
Poly’s & Mono’s.
After trying to buy some, I found out a couple of things.
Q-Cells doesn’t distribute in the USA, at least not
yet. And First Solar is BY FAR the most unfriendly company
I’ve ever seen towards individuals, as all of their
sales go to Municipalities & Government, so they don’t
need or WANT us little guys. They look for the big money….I
tried hard to get them to commit to power output, and they
just got less friendly & less friendly.
In the end, I came to the conclusion that if the big power
companies thought these panels were great, and I KNEW that
there would always be a major fight between Solar Manufacturers
over who got what contract, the winners had to be making
a GREAT product, right?
I decided to gamble…
And the search was on.
I found some First Solar Panels on Ebay, at $1.00 a watt,
at http://www.ebay.com/itm/First-Solar-FS-272-PV-Panel-3-6KW-Carton-50-New-1-W-/200688190690?pt=LH_DefaultDomain_0&hash=item2eb9f2c4e2
. Then I found another guy that had bought the same (type)
panels from the same auction, and he’d sell his for
a little less, so I bought (2) Pallets from him, at a cost
of $7,000. The panels come 50 to a box, on a pallet, and
weigh around 1500 pounds per pallet.
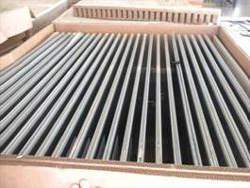
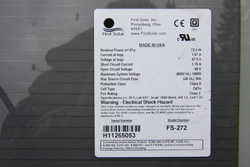
The ones I bought are First Solar FS 272’s, and are
rated at 72.5 Watts each, and are high powered, which means
that they put out enough power in a single panel that I
can hook them directly to my batteries if I ever needed
to. More important than that, I can run them in parallel,
so I don’t have anywhere in my array where a couple
of panels can knock down a “string”. (More on
this later) This is the Data Sheet & Sales Brochure
from First Solar on the Panels we bought:
http://www.firstsolar.com/~/media/WWW/Files/Downloads/PDF/Document-Library/Technology/Datasheet_s2.ashx?la=en
It cost $700 to ship them from Vacaville, CA, to Spokane,
WA, where I picked both pallets up with my F-250 (short
box).
So, when I got the panels home, of COURSE I had to play
with them!
I took a couple of them out, and hooked them up to the
Solar Controllers I bought (Outback FM80’s) and Voila!
I was making POWER from the SUN!!!!!
This was addictive…
I didn’t have all of the stuff together to mount them
yet…but MAN! They were just SITTING there in their
boxes, and there was FREEE power inside of them, right?
Here, in summer, it get’s light early, like REAL early,
4:30-5:00 a.m. or so. I got a bright idea….I started
going out in the morning, and installing 20 panels (laid
on the ground, on the side of our hill/mountain). I could
install about 20 each day, before the sun really came up,
and it started getting hot.
Before long, I had all 100 panels laid out, wire going
everywhere, every bit of it working. Tied together with
large wire nuts, it was nirvana. The panels put out a lot
of power, the most I saw was around 90 amps @ 60VDC or so,
they really cranked, considering the expert installation….it
was very cool, though, just knowing that my house was running
on the sun. Kept it this way until I started the install
on my roof.
Siting Issues
Now, I had to seriously figure out where the panels would
go.
I live on the side of a mountain, so flat space is limited.
Add to that the idea that my house faces Northwest, and
I had a quandary.
Started looking pretty hard at the house, and found out
online how to figure out where “Solar South” really
is. I did this, and here’s how it works:
Look at a sunrise & sunset table online.
http://aa.usno.navy.mil/data/docs/RS_OneDay.php After
you find out what time the sun rises & sets the day
you plan to do this, count the MINUTES between sunrise &
sunset, and divide it in half. Add that half to your sunrise
time, and you will find out EXACTLY what time Solar South
is, at your house.
So; say the sun rises at 6:00 AM, and sets at 6:00 PM.
There’s 360 minutes in the 6 hours between sunrise
& solar south, right?
Go outside, put a stake in the ground, or pin. At noon,
in this example, the shadow points at the stake, showing
you precisely where “solar south” is. Stand behind
the shadow, look at the stake. You are looking due south.
All good, right?
Uh oh.
Solar south, from my house, is off of a corner. Not good.
This means that I can’t align all of these panels to
point at solar south.
After a bunch of measuring, and a lot of stress, I decided
to put about 50 of them pointed to the southeast, and the
other 50 pointed to the southwest. Not perfect, but because
the panels were Thin Film, not horrifying, either.
Installation Planning
Now, I started looking into what all I needed to have in
order to install the panels. In reality, you really need
to have (2) main things; a wire connection system, and mounting
hardware. I started by talking to & researching “Solar
Panel” installation products.
WOW.
Shock REALLY set in….this was ugly.
The panel system to install the panels on my roof was madly
expensive, I could EASILY spend $150-200 a panel to install
them, not including the wiring. I’m not joking, I couldn’t
believe it, but there aren’t a ton of people manufacturing
this stuff, so the ones that do, well, they make coin on
it. http://www.unirac.com/residential/why-unirac
But not from me.
Then, there was the issue of wiring.
None of the manufacturers of solar company wiring products
are set up to make products so that you can install in parallel.
All of them are made so that you “daisy chain”
your panels together. This makes sense for the installers,
to me; but not the guy that owns the panels. The connectors
also were….WAY expensive. $15.00 for short cable with
ends, Ebay, 3 foot long x2 http://www.ebay.com...
I could again, EASILY spend $7-10,000 on cabling. No problemo.
But I’m too cheap for all this.
See, when this whole thing started, I got quotes on installing
7.5KW worth of panels, and it was quite…costly. The
lowest quote I received to put panels on my roof, that is
steep & high, was $79,000. The highest quote was for
$111,000. Ouch.
I want to address the idea of putting panels in series
or in parallel.
Many panels are sold, power wise, at a lower voltage. Let’s
say you have a 48V system, as example. You can take (2)
24V panels, and chain them together, or put them in series
(same thing) and end up with 48V, but at the same amperage
as both panels, but NOT doubled. So; you have (2) 24V panels
rated at 100 Watts, right? When you put them in series,
you have 48V at 100 Watts. The reason I don’t like
this is because if either of those (2) panels fail, I lose
both panels, since one is being “canceled out”
by the bad one.
The way I installed my panels was in parallel.
Here’s why.
I have 100 panels on my roof. When any (1) of them go bad,
it has no effect on ANY of the other ones. Nada.
Just that simple.
It’s more work, but hopefully my panels are a 25+
year thing.
So, I wanted to put these panels on my METAL roof. But
I didn’t want ANY holes in my roof, if I could get
around it. I spoke with a few contractors, roofing guys,
etc, and they all told me that I HAD to mount it using screws,
etc, and I didn’t believe them. Nope.
I called 3M Corporation, in Minnesota http://solutions.3m.com/en_US/index.html
. The idea I had was to glue/epoxy down the panels to the
roof, using steel UniStrut channel, somehow.
I got this friendly 3M Customer Service rep on the phone.
I told him: “I have this weird idea, I want to glue
galvanized UniStrut onto my roof, you probably don’t
have anything that will do that, huh?” He says, “oh
yeah, you need some 2116”.
Huh?
I said, “OK, you hear me right, right? I want to GLUE
galvanized metal to my metal roof. Do you really think this
will work??” (Incredulous).
He laughs at me.
Says back: “Well the US Navy uses it to glue things
on the side of Nuclear Submarines that travel all over the
world, underwater. I think it’ll hold your panels”.
Awesome.
So; I start looking for the stuff.
New, it’s E X P E N S I V E.
I found some on Ebay, & bought about 2 gallons of it.
It comes in two parts you have to mix.
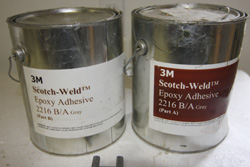
I think I paid about $150 for it.
Now, on connecting up the wires.
I knew that the wires themselves would be protected from
the sun by being underneath of the panels themselves, so
sun wasn’t a big issue. I wanted more than a wirenut
connection, but I didn’t think I needed to go the full
“weatherproof” deal, as that would mean sealed
connectors, etc.
I found these little connector boxes, they were relatively
inexpensive, seems like a dollar or 50 cents apiece or so,
and they are great, 3 Conductor, so I can feed multiple
panels through each one, and the best part- all holes are
silicon filled from the factory! Just strip the wires, insert,
and tighten. Close the door, and they’re good for a
LONG time…They’re called “Alumiconn”
connectors, manufactured by King Innovations.
http://www.kinginnovation.com/products/electrical-products/alumiconn/
Wire-
I needed wire to go from panel to panel, and from panel
string to Combiner Box. I ended up buying low voltage outdoor
wire, 12 gauge, on Ebay. I think all of the wire I needed
cost about $150.00, delivered. This cable is simple, UV
protected, already made for outdoor use, is copper, stranded,
and works FINE. Not a thing wrong with it.
http://www.ebay.com....
Mounting Hardware Planning
As I stated before, the mounting hardware, if bought from
a Solar Supplier or manufacturer, is kinda, wildly expensive,
in my opinion.
What I did was plan the install using Unistrut. This is
a galvanized channel, you can get it in a few different
depths, and it comes in 10 foot sticks.
I needed about 400 feet to do my job, and I think it was
around $400.00, from a local electrical supply house. This
is a link to Unistrut, and gives a good example of what
it looks like & how it works:
http://www.unistrut.us/index.php?WP=about_display&P=po_mf
Now, I planned on installing the UniStrut vertically, gluing
it to my roof. My panels are about 2 foot tall & 4 feet
wide. This works out close to perfect in terms of separating
out the Unistrut at a 2 foot interval horizontally, spreading
the hold down load according to First Solar’s Specifications
on their brochure, for clamping.
The Unistrut would be placed 2 feet apart from each other,
left to right.
The FS 272 Panels are frameless. Here’s how I dealt
with this.
The Unistrut is galvanized steel. I didn’t want the
glass panels to rest right on top of steel, so I researched
insulation until I came up with this stuff called “Armaflex”.
It’s actually pipe insulation, about 1/6 inch thick,
and 2 inches wide, in a roll about 30 feet long. I needed
400 feet or so of it, to adhere to the top of the Unistrut,
between the panels & the glass.
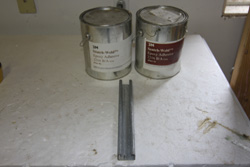
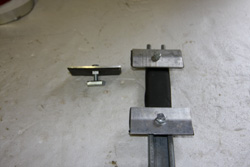
On Mounting the panels TO the Unistrut, I needed 4 clamps
per panel to hold the panels on the Unistrut. I called &
found out that the clamps that were “recommended by
the manufacturer” were almost $10.00 each, so that
would have added another BUNCH of money to the bottom line.
Nope, can’t do it. (You gotta figure; 400 panel clamps
@ $10.00 each= $4,000) Nope.
I went to a local steel supply place, CDA Metals, and had
them cut me 400 plates, 2 inches wide, 4 inches long, and
pop a 3/8 inch hole in the middle. I also had them bend
a 4 or 5 degree bend in the middle, length wise; to help
spread the load. The idea was to put a piece of Armaflex
insulation across the underside of the clamp, then run a
3/8 inch bolt through the hole, into a clamp on the Unistrut.
The plates were about $125.00, if I remember right, cut,
holed, and bent.
At this point, I was close to installing. I went &
bought a couple of waterproof boxes to use as Combiner Boxes,
and some conduit & boxes for the conduit.
Installation
First off, I want to say that this is a LOT more work than
I thought it was going to be.
I had a good friend bring his lift out, and it took us
about two days to lay all of the Unistrut, and glue it down.
Here’s how it went.
Initially, we mixed our first “batch” of material
(2116). The material is thick, almost a paste, and we decided
to install it in (4) places on each 10 foot stick of Unistrut.
We did it, and laid about 5 or 6 of them, with nothing holding
them down. About a half hour or so later, we noticed some
of them start to slide down, so we went back, and taped
them with a single piece of tape, to the roof. After that
we taped all of the rest.
With 2116, the smaller batch you make, the longer it takes
to set. The larger batch you make, the quicker it sets.
Weird, huh?
We let the glue set for about a week before I started installing
panels, and I wanted to do a “stress” test. I
wanted to know if this stuff was REALLY going to hold onto
my roof.
The result:
IF you pulled on a Unistrut from the bottom, straight towards
you, HARD, at 90 degrees, you could get the Unistrut to
come off of the roof. Of course, it wasn’t because
the glue/epoxy failed, it’s because the Paint &
Galvanization came off of my roof panel with the epoxy….WOW.
I decided that since the real “load” would be
a shear, as in the panels would always be trying to drag
themselves DOWN my roof, and not “off” of it,
I figured it would be OK.
I was right. Found this out later.
A week after we installed the Unistrut, I went to work
wiring the roof. Myself & my friend did it, and it took
about 2 days, total. Prior to wiring the roof, I made wiring
harnesses on the ground, ready for each string. All we needed
to do was lay the panels, and connect them to the harness.
I then went to installing them with a vengeance. Found
out a few things:
Best place to start is at the bottom of each string, start
at the bottom & work your way up. MUCH easier this way.
Lay the panels in so that each one rests on it’s downhill
side, then allow it to relax into the Unistrut. The Armaflex
on the Unistrut is a pretty grippy surface, so as soon as
you lay the panel down, the friction between the glass &
the Armaflex will stop the glass form moving, VERY helpful.
I forgot something…..
On the Armaflex, I spoke to one of the engineers at that
company, and asked him about outdoor use of Armaflex. He
told me that weather won’t affect it at all, but sun
will. This being the case, he told me that whatever is in
the sun will deteriorate, but if it’s protected from
the sun it’s good for at least a few decades. Since
none of the Armflex I’m using will see sun, I think
I’m OK.
It could do about 10 panels in a 3-5 hour period, depending
on where they were on the roof, etc. So, it took me about
ten mornings to do the install of the panels, by myself.
I broke one, bad, and cracked another one, so I threw out
one, and kept the other one on the ground to show people
how well they make power in low light/cloudy conditions.
Summary-
Here are the things that I found along the way, and the
results.
There are a LOT of wasps and yellowjackets in a metal roof
that’s 18 years old & has never had anyone climb
around on it.
Power:
My panels make between 32 & 36 KWH on a sunny day in
summer. On a day in the middle of winter, at the solstice
(Dec 21), they will make as little as 3KW, but almost never
less. My 3200 SF house was completely off of the grid on
August 1, 2011 ( a GREAT day!!!). Today is January 3, and
I made about 7.6KWH on a cloudy day. That’s about 147
Amps, at 55+ volts. I use plenty more than that, and our
Jacobs windmill picks up some of the slack for me. In winter
I use more power than in summer. I think that by March,
probably at latest, we’ll be completely running on
Solar again.
Cloudy Winter Day

The panels are really nice; I’ve seen them make power
even with snow on them. When they do, and even a little
spot of black shows on one corner, they will shed their
snow pretty quick. You’d be surprised.
It’s a grand thing to sit & know that the batteries
are being charged, while the house is being run, on the
sun.
The most power output I have seen at one time is 118 Amps.
(That’s a lot, about 6.5KWH). I have a possible output
of 7.1KW at a time, and even with about half of the panels
incorrectly oriented, I still got 6.5KW, which is a lot
better than I thought. This is because the panels are thin
film, and collect sun from oblique angles.
After a few good snows, and some REALLY high winds, NONE
of the glue has come off. After a little inspection today,
I found the following issues:
To my horror, one of the waterproof boxes leaked like crazy,
and was half full of water. It’s a bad seal, and I
would have never guessed it.
Probably 10% of my clamps are turned sideways, from wind
or snow. It doesn’t cause any problem I just don’t
like how it looks.
Out of all of the panels, I had (1) clamp that I didn’t
tighten enough, that was loose & moved a panel down
about 3 inches.
Everything else was tight & straight, no problem.
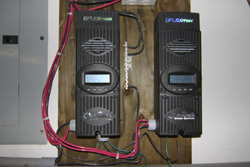
I used (2) Outback FM80 Solar Charge Controllers for the
installation, 50 panels per controller was a PERFECT fit,
per Outback. GREAT Customer service there, too.
Outback FM80 Solar Charger
Costs:
This solar installation cost about $11,000 total, including
the (2) Charge Controllers. If I had paid someone professional
to do it, I couldn’t have afforded it, right now. I
realize that my installation is not as good as a professional
one, but I think I saved at least $65,000 on what was accomplished,
so I’m living with it, and happily.
Ask any Solar Installer what they think about a system
installed on a steep two story metal roof for well under
$1.50 a watt, and watch them laugh at you.
It can be done, we did it, and I hope you do too.
Chris
Back To Off Grid Living
|